A tool that I am sure most of you don’t know how effective it is for building a successful blog, is without a doubt: Google’s Webmaster Tools otherwise know as “Google Search Console“.
With this tool, which you can access for free here, you can alert Google of new content as soon as you publish it, thus giving it better chances of your content appearing in the search engines.
If you’re new to blogging, it may be that you haven’t even heard of GWT (Google Webmaster Tools) yet. Or if you have, you either haven’t given it enough attention or you don’t exactly know what it can do for your rankings and authority online.
With this post today, I want to answer your most common questions about WMT and also show you how to use Google’s Webmaster Tools for yourself.
This stuff is a bit “technical” (although very easy to follow) but if you implement the SEO Strategies I’m about to share with you today, you should start seeing improvements in your search traffic in the coming weeks.
How To Use Google’s Webmaster Tools (Search Console)
What Is Google’ Webmaster Tools?
The WMT is what Google helps content creators like you and me submit content to the search engines but if you know where to look, it can also show you
- what is working
- what data is coming in
- what keywords are working (and what aren’t)
- and much more (as you will see later on).
Here are just a few things you can find out inside Google’s Webmaster Tools:
This is just a small list of the many features you will find in WMT but I will be talking about the most important ones and also the ones I use frequently.
Don’t worry, I will also include a video and a link to a free guide that will show you how to become a WMT expert later down below in this post.
Search Analytics
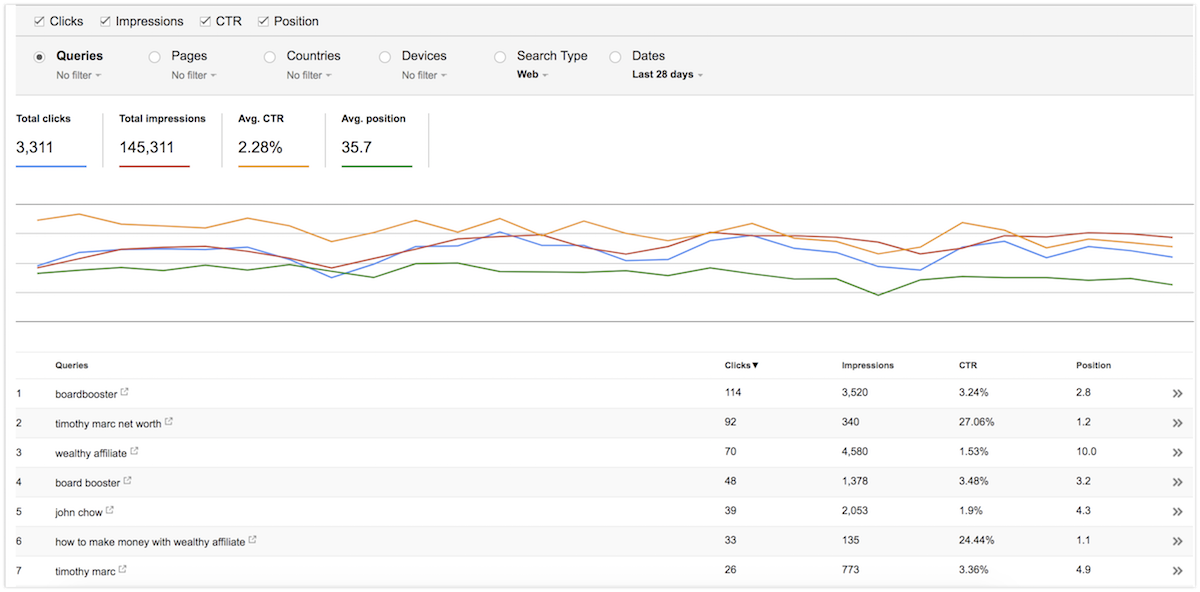
This is undoubtedly the most used feature in WMT and for good reason, it breaks down:
- How your content is appearing in search engines
- What keywords are ranking
- What position they are ranking in
- Your click through rate
- Your Impressions (how many times your content was seen, clicked / not clicked, in the SERPS.
Take a look at this screenshot of my WMT tools account for this blog you are reading right now:
Links To Your Site
In the world of SEO, backlinks are a big thing (even though they probably lost a bit of their magic).
However, I am sure they are still considered important to Google as they have dedicated a part of WT for you to be able to see who is linking to you and to what piece of content.
Here is mine:

Your Index Status
Obviously, you do want Google to index you and display your content right?
In the Index Status page, you can see how much of your content is being indexed in the SERPs, again here is an image of my indexing status.

As you can see, it has been steadily increasing lately since I’ve made a decision to double my publishing rate.
The “Fetch As Google” Tool
“Fetch as Google” is something that I definitely use a lot in WMT and it helps me bring in instant traffic for when I publish a certain piece of content.
I will explain further down below as to why I think the “Fetch As Google” tool is so important to use and understand.
How To Set Up Google Webmaster Tools
Those were just some of the features of WMT but I am sure you are starting to understand how much of a great tool this is to analyze your search engine rankings.
Interested? Let me explain to you how to properly use Google’s Webmaster Tools:
Step #1: Create Your Account
All you need is a free Google account to use WMT so if you have one, just go straight to this page, if not, you can create a Google Account here.
Step #2: Click “Add Property”
Your ‘web property” is your website i.e blog. Once you press this button, a window will come up asking you to enter your blog’s URL.
All you have to do is either type in your URL or copy/paste it from your browser (I suggest the copy/paste method as to avoid any mistakes).
Step #3: Verify Ownership Of Your Blog
Obviously, there are some security steps you have to take here and that is you need to verify that you actually own your website.
To verify your ownership, there are a few ways you can do these and they are:
- Using an HTML tag (this is the method I sue)
- Domain name provider
- Using “Google Analytics” (obviously you need to have GA set up and verified already)
- Using Google’s Tag Manager.
I won’t go into detail as to how to do these steps individually because all of the steps will be explained in the “how to guides” provided by Google for each step.
Step #4: Submit Your Sitemap
The last and final stage you would have to do is adding a sitemap.
Now, what is a “sitemap”?
A sitemap is what search engines use to see how your content is laid out, it will also be constantly updated (I will show you how) to reflect new content that you’ve published.
When the spider bots of the search engines visit your site, they will see the sitemap you have, look at the new content and start the process of indexing it and rank it accordingly.
Yes, this was explained in a simple form but that’s the process in general.
Where To Find Your Blog’s SiteMap?
In order to get a sitemap, you would have to create it, but don’t worry; all you have to do is install a simple plugin that will generate the sitemap for you.
It will also be automatically updated for when the spiders come to visit
Here is a download link for the plugin and here is how you use it:
Once you have successfully installed it, under “Settings” in your WordPress dashboard, you will find a new tab called “XML Sitemap”
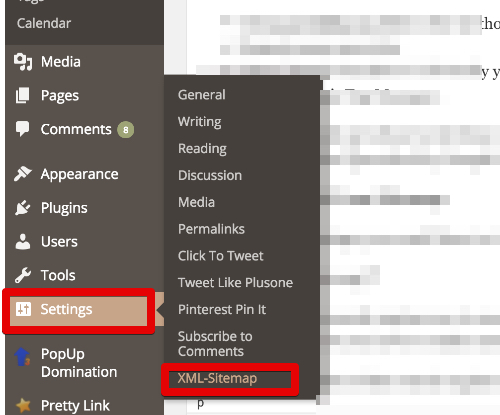
And here is where you will find your sitemap:
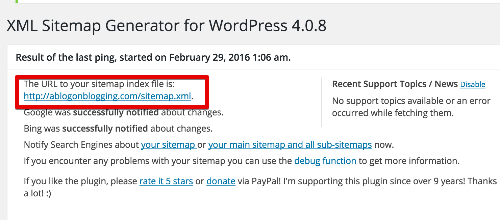
All you have to do then is copy/paste your sitemap and add it to the WMT tools where you have the “Add Sitemap” option.
After that, if the Sitemap is verified, you are good to go.
Congratulations!
How To Use Google Webmaster Tools For SEO
Now that you’ve installed and have fully set up your WMT tools, it’s time to start reaping the rewards and one thing I use to get instant results is by using that little tool I told you about earlier called the “Fetch As Google” tool.
What this nifty tool does is it “forces” Google visit your page instantly and index your content straight away.
Usually, it can take a few days for Google to visit your website, index and rank your content but with the “Fetch As Google’ tool, this process can be sped up drastically.
One of the main ways I use this tool is for when I am publishing a new review of a product.
As you may I know, I review online tools for online entrepreneurs on my other website, 3HUNDRD.com.
Sometimes I want to capitalize off the “hype” and “promotion” of a certain product so as soon as I publish my review, I use the “Fetch as Google” method to have it indexed and ranked immediately.
Usually, it’s ranking within minutes on page 1 of the search engine, which means that within a short amount of time, I will start getting readers on my post.
How is that for powerful SEO?
What To Do Once You Set It Up
Once you’ve set up your Webmaster Tools, there is not much to do except wait and let it gather data automatically for you.
(Obviously, unless you want to use the “Fetch as Google” tool)
However, by time, the more content you publish on your blog, the more data you can find over at your Webmaster Tools account.
As I’ve said earlier, you will be able to see what content is getting ranked, under which keyword, your position in the SERPs, click through rates and much more.
You can then utilize this data by looking at what is working and what isn’t and do more (or less) of that.
To me, I find that product reviews get me the most rankings and traffic that’s why I focus a lot on producing high quality, in-depth reviews.
I suggest you also make “product reviews” a huge part of your blogging schedule as they will lead to good traffic and also sales (since you will be reviewing a product and linking to it via your affiliate ID).
Here is how to find niche products to promote on your blog.
Bing’s Webmaster Tools?
You might like to know that Bing also has a “Webmaster Tools” platform and you can also create a free one with them over on Bing’s website.
There is no harm in having both of them up but I tend not to use it Bing anymore (I have it installed but I don’t check in with it).
If you also want to use Bing’s Webmaster Tool then feel free to do so, it’s basically the same process I have just explained for you to get your account set up.
Video Guide On How To Use Webmaster Tools
I know this guide can be a bit tough to swallow since I needed to pack a lot of information in here but as promised, here is a video that will explain to you the whole process so you can follow along and create your account.
This video guide is part of the “Online Entrepreneur Certification” course, a free training program you can try for free over at Wealthy Affiliate.
Final Words
I really hope you enjoyed this guide on how to setup and use Google’s Webmaster tools.
I know a lot of you out there struggle with SEO but this tool should help your efforts tremendously and if you do it right, you will be seeing results in a short while.
I would also suggest you get some free training which will show you all the steps you need to know to create a successful SEO campaign.
As we all know, SEO is super important for you to learn if you want to start an online business with the help of content marketing.
If you have any questions, be sure to leave them down below. I know the setup WMT is a complicated process so feel free to get in touch with me.
All the best.
